
How to Print Labels From an Excel Spreadsheet
Check out this post's YouTube 📹 demo: How To Print Labels From An Excel Spreadsheet To A Dymo, Zebra, Rollo Or Brother Thermal Printer.
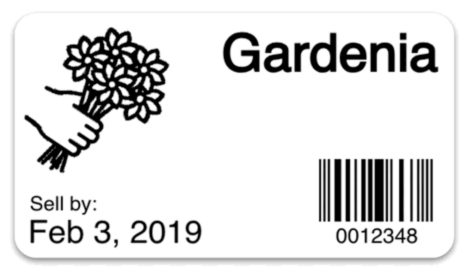
Spreadsheet Data
Label LIVE can import label data from Microsoft Excel and CSV (comma separated value) files which means learning to print labels from an excel spreadsheet is fast and easy.
For best results, ensure that the spreadsheet has short and simple header values. The text in the first row (header) will be referenced later as a variable. Label LIVE will remove any punctuation or spaces and will change all of the letters to upper-case.
Our example uses three columns:
PRODUCT - Name of the product
DATE:SELL_BY - Relative date to sell by
UPC - For the barcode
The column header "DATE:SELL_BY" tells Label LIVE to automatically create an "SELL_BY" variable and format it as a DATE.
Once you feel good about the spreadsheet data you are ready to import.
Click on the "Data" tab
Click "Import"
Choose your spreadsheet or CSV
Verify that your data rows look 👍

Follow Along and Print Labels From Excel
Try Label LIVE right now by downloading in the Mac App Store or Microsoft Windows Store. Both apps include a 14 Day Free Trial. You can also watch the YouTube video demo at How To Print Labels From An Excel Spreadsheet To A Dymo, Zebra, Rollo Or Brother Thermal Printer. 📹
Designing the Labels
Label LIVE makes the easy things easy, and the hard things possible.
First, let's add the product name as a text object. From the Data tab:
For PRODUCT, click the green ➕ button
Click "Add as Text"
Click on the new text object and place it on the right side of the label. Click on "Align" and choose "Right." This ensures that when the text changes, the label text stays aligned to the right side of the label.
Optional: If you want your text to automatically wrap to multiple lines, click on "Word Wrap" and select "Automatic" and adjust the width of the text object to use the available label space.
Test how the text changes by selecting a different row on the Data tab. 💯
How does this work? It's not magic!
The green ➕ button offers shortcuts for utilizing variables created from spreadsheet imports. To create new variables by hand you just create text and barcodes in the Design tab and add your own formatted {VARIABLE} text.
How Variables Are Made
Go ahead! Try for yourself.
Create a text object with the text "Hello {NAME}"
Jump back over to the Data tab – Label LIVE created a new NAME variable 🙌🏼
Type your name into the NAME field and it automatically changes the label
Now you can easily change all of the label's text from the Data tab.
Add a Sell By Date
Ok, back to our label. Adding the sell by date is almost identical to adding the product name.
For SELL_BY, click the green ➕ button
Click "Add as Text"
Click on the new text object and place it near the bottom-left edge of the label.
Double-click the text object and change the text to read: "Sell by: {DATE:SELL_BY}"
Click on the Data tab, and click on "SELL_BY"
Change the "Printed Format" to something shorter
Barcode Labels
To make a label easy to scan you can add a barcode that uses your imported spreadsheet data.
Click Design tab
Click Barcode, select a barcode type
On the new barcode object, click on "Value" and choose "UPC"
Each time you select a row the barcode will update from the spreadsheet data.
Search and Print Your Excel Data
Let's get printing! We made Label LIVE easy to navigate and easy to print. To search for a product just click the ROWS dropdown menu and start typing. Select a product by pressing the ENTER key on your keyboard. If you press ENTER once more, a single label will print. You can immediately start typing again to begin another search. Your hands never have to leave the keyboard.
Quickly Edit Excel Spreadsheet Data
If you need to make a quick adjustment to the imported data you can hover over the filename and click "Edit."
This same data can be exported, too. That way, your newly edited data isn't trapped in a label design document.
But Wait, There's More
Label LIVE has many other features to create labels that, by themselves, are simple and easy to use. When you begin to learn the different features, you can start to fit them together to build powerful label designs with ease.
No Label Printing Constraints
The point of this post isn't to sell you labels, or a certain kind of printer. You get to choose what labels you need. Small? Big? Your choice.
Same Goes for Printers
We believe that most printers on the market are truly great machines. Be sure to check out our current list of compatible printers for our software. And remember, if your printer isn't listed – just drop us a message and we'll try our best to add support.
That's it!
Thank you for learning how to create product labels from spreadsheet data using Label LIVE. We trust our label software is going to save your business time, and let you and your staff do what's most important: running your business.
Cheers!
Caylan
🏷💯
Check out this post's YouTube 📹 demo: How To Print Labels From An Excel Spreadsheet To A Dymo, Zebra, Rollo Or Brother Thermal Printer.